Toxin-Based Protocols
Toxin Histochemistry (THC) On Frozen Sections Using Conjugated Toxins
Venom-derived peptide toxins conjugated to fluorophores or biotin markers are powerful tools for specific biodetection in tissue sections. These reagents enable visualization and co-localization of cell membrane molecular targets in frozen tissue preparations. The following protocol outlines the use of conjugated toxins with emphasis on precision, reproducibility, and optimal imaging.
Materials
- Conjugated toxin of choice (fluorophore- or biotin-labeled).
- 1x Phosphate Buffered Saline (PBS) (02-023-1A, Sartorius).
- Streptavidin-labeled fluorophore [(for biotin-conjugated toxins) #S21374, Invitrogen].
- Hoechst 33342 (H3570, Thermo Fisher Scientific).
- Mouse C57 Brain Sagittal Frozen Sections (MF-201-SS-C57, Zyagen).
- Epredia™ Immu-Mount™ (9990402, Thermo Fisher Scientific).
Procedure
Step 1 – Preparation of Tissue Sections
- Use gentle to mild fixation methods when preparing sections to preserve the target’s native structure and ensure proper toxin binding.
1.1 Remove the slide box from the freezer (do not open) and allow it to equilibrate to room temperature (RT) for at least 30 minutes. This step is essential to prevent condensation from forming on the slides.
1.2 After opening the slide box, leave slides at RT for an additional 10-15 minutes.
1.3 Fix the tissue sections with 4% paraformaldehyde (PFA) for 10 minutes.
1.4 Wash the sections once with PBS to remove debris and rehydrate the tissue.
Step 2 – Toxin Incubation
This step enables the conjugated toxin to selectively bind to its molecular target within the tissue.
2.1 Dilute the conjugated toxin according to the instructions provided in its Certificate of Analysis.
2.2 Apply the diluted toxin on the tissue sections and place in a humidified chamber.
- Incubate 1 hour at 37°C.
- Optimize toxin concentration and incubation time for each tissue type and target molecule.
- Protect fluorescent reagents from light to avoid photobleaching.
- Include the appropriate controls: no-toxin control and unlabeled toxin control.
Step 3 – Streptavidin (for biotin-conjugated toxins only)
A streptavidin-labeled fluorophore amplifies the signal from biotinylated toxins.
3.1 Wash sections with PBS three times for 5 minutes each, to remove unbound toxin.
3.2 Apply the streptavidin-conjugated fluorophore.
- Incubate 30 minutes at RT.
Step 4 – Nuclear Counterstaining (Optional)
Provides cellular context by labeling nuclei.
4.1 Wash sections with PBS three times for 5 minutes each.
4.2 For nuclear counterstaining: apply Hoechst 33342 (2 µg/mL).
- Incubate 10 min. at RT.
4.3 Rinse sections three times with PBS.
Step 5 – Mounting and Imaging
5.1 Apply ~3 drops of mounting medium (e.g., Immu-Mount) onto each slide and affix a coverslip.
- Allow slides to dry for ≥30 minutes at RT.
5.2 Examine samples by fluorescence microscopy.
Troubleshooting
| Problem | Possible Cause | Solution |
|---|---|---|
| Low signal | Fluorophore degradation, poor target expression, or inappropriate toxin concentration | Verify storage and reconstitution of toxins; confirm target protein expression in the chosen cell line; optimize toxin concentration |
| High background | Excess toxin or insufficient washing | Reduce toxin concentration and/or incubation time; increase washing steps |
| Photobleaching | Prolonged light exposure | Minimize light exposure; protect slides from ambient light |
Example Data
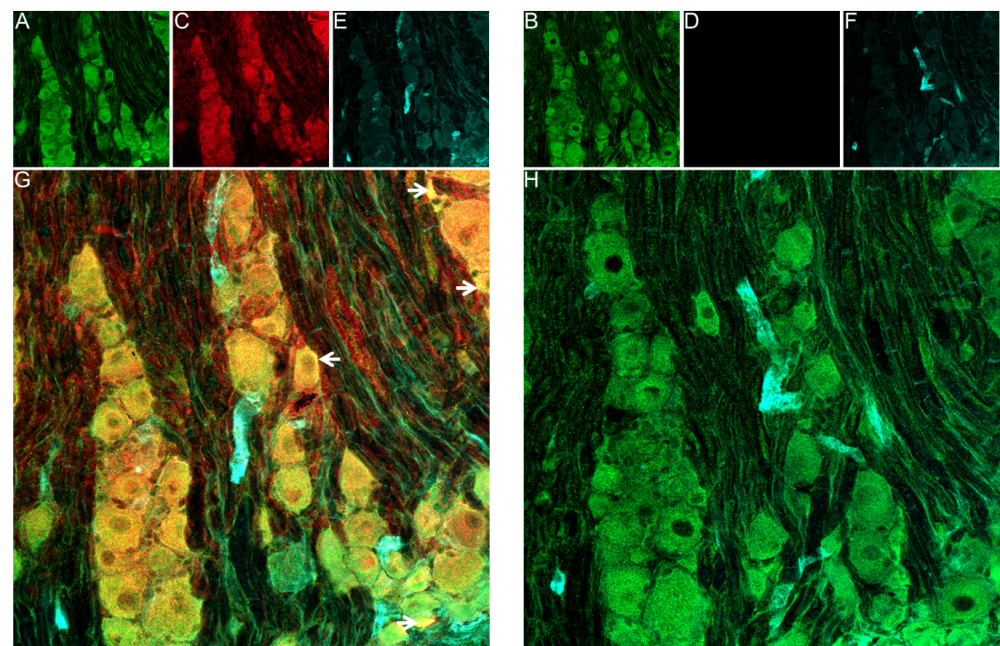
A-B) Anti-Piezo1 (extracellular) Antibody (#APC-087) staining followed by goat anti-rabbit Alexa Fluor 488 secondary antibody resulted in green fluorescence predominantly in DRG cells. C-D) The same frozen sections were then incubated with either GsMTx-4-Biotin (#STG-100-B) (C) or GsMTx-4 (#STG-100) (D), followed by staining with Alexa Streptavidin-647, producing red fluorescence in DRG cells. E-F) CellMask™ Actin 1X solution was applied to visualize the cellular membrane. G-H) Merged images of DRG cells are shown. Arrows indicate GsMTx-4 localization in mechanosensitive ion channels; (H) lacks this signal.